
Lanthorn self-serve User Manual
Please check our FAQ page first
Introduction
Lanthorn is a secure, accurate, and cost effective video analytics solution that monitors occupancy, social distancing, and face mask usage.
The purpose of this documentation is to walk you through the setup of Lanthorn.
Prerequisites for this setup are as follows below.
-
One of the following supported devices:
-
Nvidia's Jetson Nano / TX2
-
Coral Dev Board
-
Any computer with an x86 CPU
-
AMD64 node with attached Coral USB Accelerator
-
X86 node accelerated with OpenVino toolkit
-
X86 node with Nvidia GPU
-
-
An IP Camera, deployed in the same local network as the processing device (or with access through the Internet).
-
A Lanthorn account, which you can create at app.lanthorn.ai/register.
For implementation services or enterprise use cases, please contact sales.
Architecture overview and hardware requirements
Lanthorn is composed of two components.
- Its processor component, which is open-sourced at Lanthorn Processor, is the component that runs on your local processing node (or on cloud) and generates the data required to populate the webpage's dashboard.
- Its Dashboard component, which provides a web interface to configure and visualize the output of the processed cameras.
The processor node consumes from the feed of existing IP cameras and through AI algorithms. It then processes and generates the analytics for the Lanthorn dashboard. If video logging is enabled, the last seconds of processed video are stored in order for your browser to stream them locally.
The sole purpose of the Lanthorn Server is storing the dashboard account information and the processor connection information (URL, username and password). The latter is encrypted by the frontend, to protect your account's data when deleting the browser's cache or entering through another device. Lanthorn's analytics can be accessed from our online dashboard.
The following diagram shows the network topology:
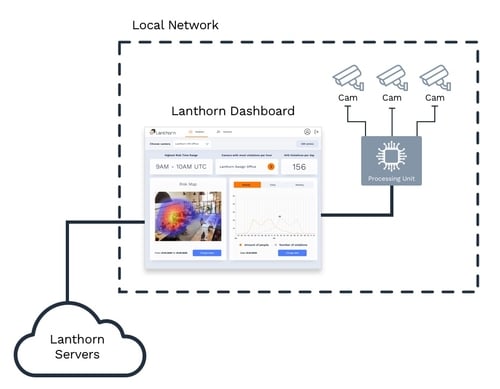
Its components are:
- Outside of your local network:
- Lanthorn Servers - Where light backend and static frontend code is hosted.
- Inside your local network:
- Your IP Cameras that capture and stream video through the network.
- The Processing Node that consumes video from the cameras and generates analytics.
- Your Internet** Browser , in which you access the Lanthorn Dashboard and which reads the data of your local processor. It is important to note that data is always consumed from the Browser , and not from our servers, so your data never leaves your local network.**
Setup Guide
System Requirements
Depending on the chosen device, the system requirements can vary. One of the cheapest options is using an accelerator USB (Coral or OpenVino). These edge devices connect to a computer, and allow you to efficiently run accurate models without spending much money on hardware.
The minimum requirements for each device can be found in the following table:
| Device | Hardware | Operating System | Software |
|---|---|---|---|
| X86 CPU (Virtual - physical - cloud) | - Any processor compatible with the x86* instruction set. To ensure good performance, we recommend Intel Core i7 / i9-10xxx. - For Memory, we recommend at least 8GB. |
- Linux, Mac or Windows | - Docker |
| X86 CPU with attached USB TPU accelerator | - x86 computer (Virtual/physical) - Processor: Any processor compatible with the x86* instruction set. To ensure good performance, we recommend Intel Core i3 / i5 / i7 / i9-10xxx. - For Memory, if you want to build the docker image in this machine, we recommend 4GB. If you want just to run the processor, 2GB is enough. *** If you choose to use a virtual machine, check that the virtualization engine allows mapping a TPU device to the virtual device. - USB Accelerator device (connected to the computer) |
- Preferentially Linux or Mac. We don’t recommend Windows because integrating a TPU accelerator with docker on Windows platforms requires additional steps that vary from version to version. Using Linux (or Mac), the installation process is trivial. |
- Docker - Any software the TPU requires (e.g., coral accelerator requires the installation of the runtime.) |
| Jetson Nano | - Jetson Nano - microSD card (32GB UHS-1 minimum recommended) |
- You can follow the official documentation to install the corresponding OS. | - Docker - JetPack 4.3 |
| Jetson TX2 | Jetson TX2microSD card (32GB UHS-1 minimum recommended) | - You can follow the official documentation to install the corresponding OS. | - Docker - JetPack 4.4 |
| X86 node with Nvidia GPU | - x86 computer (Virtual/physical): - Processor: Any processor compatible with the x86* instruction set. To ensure good performance, we recommend Intel Core i3 / i5 / i7 / i9-10xxx. - For memory, if you want to build the docker image in the machine, we recommend 4GB. If you just want to run the processor, 2GB is enough. *** If you choose to use a virtual machine, check that the virtualization engine allows mapping a GPU device to the virtual device. |
- Linux or Mac. We don’t recommend Windows because recognizing a GPU from docker on Windows platforms requires some additional steps that vary from version to version. Using Linux (or Mac), the integration is trivial. |
- Docker - Nvidia Drivers - Nvidia docker toolkit |
| GPU cloud instance (AWS) | - Any EC2 GPU instance (with nvidia) can be used. For example: - EC2 G3 Instances - EC2 G4 Instances - EC2 P2 Instances - EC2 P3 Instances - EC2 P4 Instances |
- Any linux distribution available for the chosen instance. | - Docker - AWS Nvidia drivers |
Device preparation
Lanthorn can be run on the listed devices without many prerequisites. You only need to install git and Docker (version 19.03 or higher if you are using a GPU).
Using a Jetson Nano
Nvidia's Jetson Nano is a low cost and low power embedded system-on-module (SoM) that focuses on running machine learning software. You can easily set up your Jetson Nano following Nvidia's official setup guide.
Using a Coral dev board
The Dev Board is a single-board computer that is ideal when you need to perform fast machine learning inferencing in a small form factor. You can set up your device following the official coral documentation.
Using an Nvidia GPU
An Nvidia GPU can be used to run complex neural networks efficiently. You only need to install the required Nvidia drivers and the Nvidia docker toolkit.
Running the software on the processor
There are three alternatives to run the processor in your device:
- Using git and building the docker image yourself.
- Pulling the (already built) image from Neuralet's Docker Hub repository
- Using docker-compose to build and run the processor.
1. Building the image yourself
Before building the images, you need you to clone Smart Social Distancing's code from their GitHub repository on the device:
  git clone [github.com/neuralet/smart-social-distancing.git](https://github.com/neuralet/smart-social-distancing.git)
  cd smart-social-distancing
After that, checkout to the latest release:
  git fetch --tags
  git checkout $(git tag | tail -1)
Depending the device, you will need to execute 2-3 additional steps:
- Download the model (only for some devices)
- Build the docker image
- Run the processor
The first 2 steps are only needed during the first-time setup or when you upgrade the software version. The last one launches the software and must be re-run in case it's stopped (for instance, after a reboot).
The detailed steps per supported device are:
Jetson Nano
- Download TensorRT engine file built with JetPack 4.3:
./download\_jetson\_nano\_trt.sh
- Build Docker image for Jetson Nano
docker build -f jetson-nano.Dockerfile -t "neuralet/smart-social-distancing:latest-jetson-nano" .
- Run Docker container:
docker run -it --runtime nvidia --privileged -p HOST\_PORT:8000 -v "$PWD":/repo -e TZ=\`./timezone.sh` neuralet/smart-social-distancing:latest-jetson-nano
Jetson TX2
- Download TensorRT engine file built with JetPack 4.3:
./download\_jetson\_tx2\_trt.sh
- Build Docker image for Jetson TX2
docker build -f jetson-tx2.Dockerfile -t "neuralet/smart-social-distancing:latest-jetson-tx2" .
- Run Docker container:
docker run -it --runtime nvidia --privileged -p HOST\_PORT:8000 -v "$PWD":/repo -e TZ=\`./timezone.sh` neuralet/smart-social-distancing:latest-jetson-tx2
Coral Dev Board
- Build Docker image
docker build -f coral-dev-board.Dockerfile -t "neuralet/smart-social-distancing:latest-coral-dev-board" .
- Run Docker container:
docker run -it --privileged -p HOST\_PORT:8000 -v "$PWD":/repo -e TZ=`./timezone.sh` neuralet/smart-social-distancing:latest-coral-dev-board
X86 CPU with attached Coral USB Accelerator
- Build Docker image
docker build -f amd64-usbtpu.Dockerfile -t "neuralet/smart-social-distancing:latest-amd64" .
- Run Docker container:
docker run -it --privileged -p HOST\_PORT:8000 -v "$PWD":/repo -e TZ=`./timezone.sh` neuralet/smart-social-distancing:latest-amd64
X86
- Download the model
If you use the OpenPifPaf model, download the model first:
./download-x86-openpifpaf-model.sh
If you use the MobileNet model run this instead:
./download\_x86\_model.sh
- Build Docker image
docker build -f x86.Dockerfile -t "neuralet/smart-social-distancing:latest-x86\_64" .
- Run Docker container:
docker run -it -p HOST\_PORT:8000 -v "$PWD":/repo -e TZ=`./timezone.sh` neuralet/smart-social-distancing:latest-x86\_64
X86 with GPU
- Download the model
If you use the OpenPifPaf model, download the model first:
./download-x86-openpifpaf-model.sh
If you use the MobileNet model run this instead:
./download\_x86\_model.sh
- Build Docker image
docker build -f x86-gpu.Dockerfile -t "neuralet/smart-social-distancing:latest-x86\_64\_gpu" .
- Run Docker container:
Notice: you must have Docker >= 19.03 to run the container with --gpus flag.
docker run -it --gpus all -p HOST\_PORT:8000 -v "$PWD":/repo -e TZ=`./timezone.sh` neuralet/smart-social-distancing:latest-x86\_64\_gpu
If you want to use the TensorRT model follow these steps:
- Build Docker image
docker build -f x86-gpu-tensorrt-openpifpaf.Dockerfile -t "neuralet/smart-social-distancing:latest-x86\_64\_gpu\_tensorrt" .
- Run Docker container:
Notice: you must have Docker >= 19.03 to run the container with --gpus flag.
docker run -it --gpus all -p HOST\_PORT:8000 -v "$PWD":/repo -e TZ=`./timezone.sh` neuralet/smart-social-distancing:latest-x86\_64\_gpu\_tensorrt
X86 using OpenVino
- Download the model
./download\_openvino\_model.sh
- Build Docker image
docker build -f x86-openvino.Dockerfile -t "neuralet/smart-social-distancing:latest-x86\_64\_openvino" .
- Run Docker container:
docker run -it -p HOST\_PORT:8000 -v "$PWD":/repo -e TZ=`./timezone.sh` neuralet/smart-social-distancing:latest-x86\_64\_openvino
2. Using Neuralet's Docker Hub repository
Before running any of the images available in the Docker repository, you need to follow these steps to have your device ready.
- Create a data folder.
- Copy the config file (available in this repository) corresponding to your device.
- Copy the bash script(s) (available in this repository) required to download the model(s) your device requires.
- Optionally, copy the script timezone.sh (available in this repository) to run the processor using your system timezone instead of UTC.
Alternatively you can just clone the repository and pull the image from Dockerhub from there.
Jetson Nano
Download TensorRT engine file built with JetPack 4.3:
mkdir data/jetson
./download\_jetson\_nano\_trt.sh
Run Docker container:
docker run -it --runtime nvidia --privileged -p HOST\_PORT:8000 -v $PWD/data:/repo/data -v $PWD/config-jetson-nano.ini:/repo/config-jetson-nano.ini -e TZ=`./timezone.sh` neuralet/smart-social-distancing:latest-jetson-nano
Jetson TX2
Download TensorRT engine file built with JetPack 4.4
mkdir data/jetson
./download\_jetson\_tx2\_trt.sh
Run Docker container:
docker run -it --runtime nvidia --privileged -p HOST\_PORT:8000 -v $PWD/data:/repo/data -v $PWD/config-jetson-tx2.ini:/repo/config-jetson-tx2.ini -e TZ=`./timezone.sh` neuralet/smart-social-distancing:latest-jetson-tx2
Coral Dev Board
docker run -it --privileged -p HOST\_PORT:8000 -v $PWD/data:/repo/data -v $PWD/config-coral.ini:/repo/config-coral.ini -e TZ=`./timezone.sh` neuralet/smart-social-distancing:latest-coral-dev-board
X86 CPU with attached Coral USB Accelerator
docker run -it --privileged -p HOST\_PORT:8000 -v $PWD/data:/repo/data -v $PWD/config-coral.ini:/repo/config-coral.ini -e TZ=`./timezone.sh` neuralet/smart-social-distancing:latest-amd64
X86
Download the models
mkdir data/x86
If you use the OpenPifPaf model, download the model first:
./download-x86-openpifpaf-model.sh
If you use the MobileNet model run this instead:
./download\_x86\_model.sh
Run Docker container:
docker run -it -p HOST\_PORT:8000 -v $PWD/data:/repo/data -v $PWD/config-x86.ini:/repo/config-x86.ini -e TZ=`./timezone.sh` neuralet/smart-social-distancing:latest-x86\_64
X86 with GPU
Download the models
mkdir data/x86
If you use the OpenPifPaf model, download the model first:
./download-x86-openpifpaf-model.sh
If you use the MobileNet model run this instead:
./download\_x86\_model.sh
Docker container:
Notice: you must have Docker >= 19.03 to run the container with --gpus flag.
docker run -it --gpus all -p HOST\_PORT:8000 -v $PWD/data:/repo/data -v $PWD/config-x86-gpu.ini:/repo/config-x86-gpu.ini -e TZ=`./timezone.sh` neuralet/smart-social-distancing:latest-x86\_64\_gpu
If you want to use the TensorRT model follow these steps:
Run Docker container:
Notice: you must have Docker >= 19.03 to run the container with --gpus flag.
docker run -it --gpus all -p HOST\_PORT:8000 -v $PWD/data:/repo/data -v $PWD/config-x86-gpu-tensorrt.ini:/repo/config-x86-gpu-tensorrt.ini -e TZ=`./timezone.sh` neuralet/smart-social-distancing:latest-x86\_64\_gpu\_tensorrt
X86 using OpenVino
mkdir data/x86
./download\_openvino\_model.sh
Run Docker container:
docker run -it -p HOST\_PORT:8000 -v $PWD/data:/repo/data -v $PWD/config-x86-openvino.ini:/repo/config-x86-openvino.ini -e TZ=`./timezone.sh` neuralet/smart-social-distancing:latest-x86\_64\_openvino
3. Using docker-compose
Before building the images, you need you to install docker-compose following the official installation guide. In some edge devices, such as Coral or Jetson Nano, the official installation guide can fail because there isn’t in the repository an already build image for that device architecture. If this is the case, we recommend installing docker-compose using pip
Then, you need you to clone Smart Social Distancing's code from their GitHub repository on the device:
  git clone [github.com/neuralet/smart-social-distancing.git](https://github.com/neuralet/smart-social-distancing.git)
  cd smart-social-distancing
After that, checkout to the latest release:
  git fetch --tags
  git checkout $(git tag | tail -1)
Depending the device, you will need to execute 2-3 additional steps:
- Download the model (only for some devices)
- Build the docker image
- Run the processor
The first 2 steps are only needed during the first-time setup or when you upgrade the software version. The last one launches the software and must be re-run in case it's stopped (for instance, after a reboot).
The detailed steps per supported device are:
Jetson Nano
- Download TensorRT engine file built with JetPack 4.3:
./download\_jetson\_nano\_trt.sh
- Build Docker image for Jetson Nano (you can omit this step and use the docker-hub images)
docker-compose -f docker-compose.yml -f docker-compose-jetson-nano.yml build
- Run Docker container:
docker-compose -f docker-compose.yml -f docker-compose-jetson-nano.yml up
Jetson TX2
- Download TensorRT engine file built with JetPack 4.3:
./download\_jetson\_tx2\_trt.sh
- Build Docker image for Jetson TX2 (you can omit this step and use the docker-hub images)
docker-compose -f docker-compose.yml -f docker-compose-jetson-tx2.yml build
- Run Docker container:
docker-compose -f docker-compose.yml -f docker-compose-jetson-tx2.yml up
Coral Dev Board
- Build Docker image for Coral (you can omit this step and use the docker-hub images)
docker-compose -f docker-compose.yml -f docker-compose-coral-dev.yml build
- Run Docker container:
docker-compose -f docker-compose.yml -f docker-compose-coral-dev.yml up
X86 CPU with attached Coral USB Accelerator
- Build Docker image for Coral USB Accelerator (you can omit this step and use the docker-hub images)
docker-compose -f docker-compose.yml -f docker-compose-amd64.yml build
- Run Docker container:
docker-compose -f docker-compose.yml -f docker-compose-amd64.yml up
X86
- Download the model
If you use the OpenPifPaf model, download the model first:
./download-x86-openpifpaf-model.sh
If you use the MobileNet model run this instead:
./download\_x86\_model.sh
- Build Docker image for x86 (you can omit this step and use the docker-hub images)
docker-compose -f docker-compose.yml -f docker-compose-x86.yml build
- Run Docker container:
docker-compose -f docker-compose.yml -f docker-compose-x86.yml up
X86 with GPU
- Download the model
If you use the OpenPifPaf model, download the model first:
./download-x86-openpifpaf-model.sh
If you use the MobileNet model run this instead:
./download\_x86\_model.sh
- Build Docker image for gpu (you can omit this step and use the docker-hub images)
docker-compose -f docker-compose.yml -f docker-compose-gpu.yml build
- Run Docker container:
docker-compose -f docker-compose.yml -f docker-compose-gpu.yml up
If you want to use the TensorRT model follow these steps:
- Build Docker image
docker-compose -f docker-compose.yml -f docker-compose-gpu-tensorrt.yml build
- Run Docker container:
docker-compose -f docker-compose.yml -f docker-compose-gpu-tensorrt.yml up
X86 using OpenVino
- Download the model
./download\_openvino\_model.sh
- Build Docker image for openvino (you can omit this step and use the docker-hub images)
docker-compose -f docker-compose.yml -f docker-compose-x86-openvino.yml build
- Run Docker container:
docker-compose -f docker-compose.yml -f docker-compose-x86-openvino.yml up
Additional setup steps
If you want to enable HTTPS in the processing node (as is recommended), you need to follow the steps defined here. If you are using the dashboard, we recommend enabling it to avoid allowing Mixed Content in your browser (more details explained in the "Sign up in the platform" section).
Lastly, you will need the local IP address of your processing node as well as the IP addresses of all the IP cameras you want to analyze for the Lanthorn setup.
You can get the IP address of your device with the following commands:
1. sudo apt install net-tools

2. ifconfig
3. Write down the enp8s0 inet address
Optional - Configuring AWS credentials
Some of the implemented features allow you to upload files into an S3 bucket. To do that you need to provide the envs AWS_BUCKET_REGION, AWS_ACCESS_KEY_ID and AWS_SECRET_ACCESS_KEY. An easy way to do that is to create a .env file (following the template .env.example) and pass the flag –env-file .env when you run the processor.
Enabling SSL
We recommend exposing the processors' APIs using HTTPS. To do that, you need to create a folder named certs with a valid certificate for the processor (with its corresponding private key) and configure it in the config-*.ini file (SSLCertificateFile and SSLKeyFile configurations).
If you don't have a certificate for the processor, you can create a self-signed one using openssl and the scripts create_ca.sh and create_processor_certificate.sh.
1) Create your own CA (certification authority)
./create\_ca.sh
After the script execution, you should have a folder certs/ca with the corresponding *.key, *.pem and *.srl files
2) Create a certificate for the processor
./create\_processor\_certificate.sh \<PROCESSOR\_IP\>
After the script execution, you should have a folder certs/processor with the corresponding *.key, *.crt, *.csr and *.ext files
As you are using a self-signed certificate you will need to import the created CA (using the .pem file) in your browser as a trusted CA.
Configuring OAuth2 in the endpoints
By default, all the endpoints exposed by the processors are accessible by everyone with access to the LAN. To avoid this vulnerability, the processor includes the possibility of configuring OAuth2 to keep your API secure.
To configure OAuth2 in the processor you need to follow these steps:
Enabling OAuth2 in the API by setting in True the parameter UseAuthToken (included in the API section).
Set into the container the env SECRET_ACCESS_KEY. This env is used to encode the JWT token. An easy way to do that is to create a .env file (following the template .env.example) and pass the flag –env-file .env when you run the processor.
Create an API user. You can do that in two ways:
Using the create_api_user.py script:
Inside the docker container, execute the script python3 create_api_user.py –user=<USER> –password=<PASSWORD>. For example, if you are using an x86 device, you can execute the following script.
docker run -it -p HOST\_PORT:8000 -v "$PWD":/repo -e TZ=\`./timezone.sh` neuralet/smart-social-distancing:latest-x86\_64 python3 create\_api\_user.py --user=\<USER\> --password=\<PASSWORD\>
Using the /auth/create_api_user endpoint: Send a POST request to the endpoint http://<PROCESSOR_HOST>:<PROCESSOR_PORT>/auth/create_api_user with the following body:
{
  "user": <USER>,
  "password": <PASSWORD>
}
After executing one of these steps, the user and password (hashed) will be stored in the file /repo/data/auth/api_user.txt inside the container. To avoid losing that file when the container is restarted, we recommend mounting the /repo directory as a volume.
Request a valid token. You can obtain one by sending a PUT request to the endpoint http://<PROCESSOR_HOST>:<PROCESSOR_PORT>/auth/access_token with the following body:
{
  "user": <USER>,
  "password": <PASSWORD>
}
The obtained token will be valid for 1 week (then a new one must be requested from the API) and needs to be sent as an Authorization header in all the requests. If you don't send the token (when the UseAuthToken attribute is set in True), you will receive a 401 Unauthorized response.
Sign up to the platform
With your device running, and all the necessary IPs, you can now use the Lanthorn Dashboard.
Follow these steps to access it:
-
Sign up at app.lanthorn.ai
-
Verify your email address
-
Sign in and follow the onboarding process:
a. Register your processor's IP address, please note that if you enabled SSL the url must be https://IP:Port, otherwise http://IP:Port.
b. Register your local cameras as sources for your local processor (providing their IP addresses)
c. Grouping your cameras into areas (such as 1st floor or lobby)
As the Lanthorn dashboard is published over HTTPS, you will need to follow the steps defined here in order to enable SSL in the processor. If you would rather communicate through HTTP, you must edit your site settings for app.lanthorn.ai in order to allow for Mixed Content (Insecure Content). The process of doing depends on your browser, here are examples for Firefox, Google Chrome, Microsoft Edge, and Brave.
Without doing either of these steps, the browser will block all the insecure requests to the processor and you will not be able to communicate with it.
Feature walkthrough
The following section provides a brief description of each page on Lanthorn's website and its functionality.
Login section
The login screen is the first thing that you'll see. Apart from logging in, it has links to the account registration and "forgot password" screens. Once you register, you will receive an email to verify your email address and activate your account. Once you activate your account, you can login and start using Lanthorn.
Setup section
You will encounter this section the first time you log in to your account, as the processing unit needs to receive information about the IP camera feeds it will process.
Processor and camera configuration
This step requires information about the cameras and processing unit. Each camera requires the following information:
-
Name
-
Processor path (IP address of the processing unit that will analyze its feed)
-
Camera path (IP address of the camera)
-
Notification settings (i.e. if you want email notifications; and required frequency of violations to trigger a notification)
Dashboard
This is the welcome screen of Lanthorn. It shows you a list of your cameras and areas, and allows you to view the most recent analytics and historical statistical data for previous hours, days, and weeks.
You can also access the processed live feed of each camera (as long as the video_logger is enabled), which shows you the work of the model as it processes video.
Troubleshooting
You may encounter one of the following error messages when attempting to save your configuration:
"Can't reach authentication server"
Likely caused by a problem in your internet connection or Lanthorn's servers being down.
"Can't reach processing unit"
Likely caused by misconfiguration in your local network. You can try pinging the processing unit from the device running the dashboard, Lanthorn should work if the ping does.
Supported video feeds formats
This processor uses OpenCV VideoCapture, which means that it can process:
Video files that are compatible with FFmpeg
Any URL of video stream in a public protocol such as RTSP and HTTP (protocol://host:port/script_name?script_params|auth)
Please note that:
Although this processor can read and process a video file, this is mostly a development functionality; this is due to the fact that loggers yield statistics that are time dependant that assume a real-time stream being processed, in which if the processing capacity is lower than the FPS, frames are lost in favour of processing new frames. With a video file all frames are processed and on a slower model this might take a while (and yield wrong analytics).
Some IP cameras implement their own private protocol that's not compatible with OpenCV.
If you want to integrate an IP camera that uses a private protocol, you should check with the camera provider if the device supports exporting its stream in a public protocol. For example, WYZE doesn't support RTSP as default, but you have the possibility of installing a firmware that supports it. Same goes for Google Nest Cameras, although here a token must be kept alive to access the RTSP stream